Rain Sensing Wiper using Arduino Nano with OLED — Step-by-Step Guide Leave a comment
This post contains affiliate links. If you buy through Amazon links, we earn a small
commission at no extra cost to you. We always list Electronixity first.
Ever wondered how a car’s automatic wiper knows exactly when it starts raining? This
rain sensing wiper project recreates that behaviour on a desktop scale using an Arduino Nano, a
rain sensor, an MG90 servo motor, and a
0.96″ OLED display. When the rain sensor detects moisture, a servo-driven
wiper arm starts sweeping back and forth while the OLED animates raindrops and a matching
wiper blade in real time. The moment it’s dry again, the wiper parks itself and the OLED
switches to a cheerful sun animation. It’s an intermediate build — budget 45–60 minutes for
wiring and code — and a great demonstration of automatic, sensor-driven control for STEM and
engineering mini-projects.
Features & What You’ll Learn
- Digital rain sensing and state-change detection
- Driving a servo and an OLED animation in perfect sync
- Non-blocking timing with
millis()instead ofdelay() - Simple animated graphics on an SSD1306 OLED (drops, wiper arm, sun rays)
- Difficulty level: Intermediate
- Estimated build time: 45–60 minutes
Bill of Materials (BOM)
Here’s everything you need for this build. We’ve linked each part to Electronixity so you
can order them in one cart, with Amazon India as a backup option.
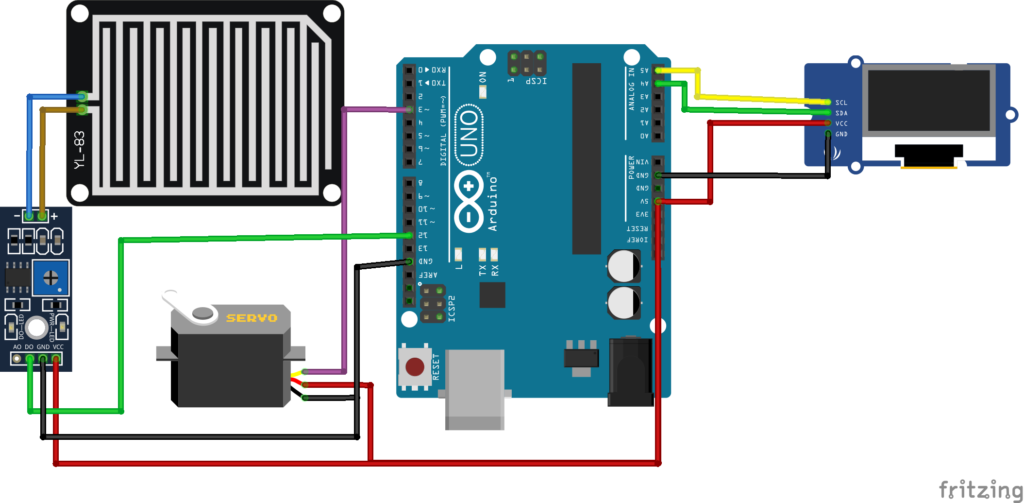
Circuit Diagram & Pin Connections
The rain sensor outputs a simple digital HIGH/LOW signal, the
OLED runs over I2C, and the MG90 servo drives the physical
wiper arm.
| Component Pin | Arduino Nano Pin |
|---|---|
| OLED VCC | 5V |
| OLED GND | GND |
| OLED SDA | A4 |
| OLED SCL | A5 |
| Rain Sensor VCC | 5V |
| Rain Sensor GND | GND |
| Rain Sensor D0 | D12 |
| MG90 Servo Signal | D3 |
| MG90 Servo VCC | 5V (external supply recommended) |
| MG90 Servo GND | GND |
Step-by-Step Assembly
- Wire the OLED to the Nano’s I2C pins (A4/A5), same as any standard
SSD1306 module. - Connect the rain sensor‘s digital output (D0) to pin D12. This board is
most commonly active LOW — meaning it reads LOW when wet, HIGH when dry. - Attach a small wiper-arm shape to the MG90 servo horn and connect its
signal wire to D3. - Install the Adafruit GFX and Adafruit SSD1306
libraries from the Arduino IDE Library Manager before uploading. - Place a few drops of water on the rain sensor’s exposed plate to test detection once
everything is wired.
Adjust the sensitivity potentiometer on the rain sensor board (if present) so a small
amount of water reliably triggers a state change without false positives from humidity.
Code
This sketch checks the rain sensor every 200 ms, switches between a “wet” and “dry” state,
and animates the OLED accordingly — falling raindrops with a sweeping wiper line when wet, or
a rotating sun icon when dry. The MG90 servo always mirrors the wiper angle drawn on screen.
#include <Wire.h>
#include <Adafruit_GFX.h>
#include <Adafruit_SSD1306.h>
#include <Servo.h>

// -------------------- OLED CONFIG --------------------
#define SCREEN_WIDTH 128
#define SCREEN_HEIGHT 64
Adafruit_SSD1306 display(SCREEN_WIDTH, SCREEN_HEIGHT, &Wire, -1);

// -------------------- PINS --------------------
const int RAIN_PIN  = 12;   // Rain sensor DIGITAL output
const int SERVO_PIN = 3;    // MG90 signal

// Digital rain sensor is usually ACTIVE LOW (0 = rain, 1 = dry)
const int RAIN_ACTIVE_LEVEL = LOW;

// -------------------- RAIN STATE LOGIC --------------------
enum RainState : uint8_t { RAIN_DRY, RAIN_WET };
RainState rainState = RAIN_DRY;

// -------------------- TIMING --------------------
unsigned long lastSensorReadMs = 0;
const unsigned long SENSOR_INTERVAL_MS = 200;

unsigned long lastAnimMs = 0;
unsigned long animIntervalMs = 60;

// -------------------- RAIN ANIMATION --------------------
struct Drop { int x; int y; };
const int MAX_DROPS = 16;
Drop drops[MAX_DROPS];

void initDrops() {
  for (int i = 0; i < MAX_DROPS; i++) {
    drops[i].x = random(0, SCREEN_WIDTH);
    drops[i].y = random(-SCREEN_HEIGHT, 0);
  }
}

void updateDrops(int activeDrops) {
  for (int i = 0; i < activeDrops; i++) {
    int speed = 2;
    drops[i].y += speed;
    if (drops[i].y > SCREEN_HEIGHT) {
      drops[i].y = random(-20, 0);
      drops[i].x = random(0, SCREEN_WIDTH);
    }
  }
}

// -------------------- WIPER ANIMATION + SERVO --------------------
Servo wiperServo;
const int WIPER_MIN_ANGLE = 40;
const int WIPER_MAX_ANGLE = 140;
int wiperAngle = WIPER_MIN_ANGLE;
int wiperDir   = 1;

// -------------------- SUN ANIMATION --------------------
int sunPhase = 0;

// -------------------- RAIN STATE --------------------
void updateRainStateDigital(int level) {
  RainState newState = (level == RAIN_ACTIVE_LEVEL) ? RAIN_WET : RAIN_DRY;

  if (newState != rainState) {
    rainState = newState;
    if (rainState == RAIN_DRY) {
      wiperAngle = WIPER_MIN_ANGLE;
      wiperServo.write(wiperAngle);
    }
  }
}

// -------------------- STEP ANIMATIONS --------------------
void stepAnimations() {
  if (rainState == RAIN_WET) {
    updateDrops(MAX_DROPS);

    wiperAngle += wiperDir * 3;
    if (wiperAngle >= WIPER_MAX_ANGLE) {
      wiperAngle = WIPER_MAX_ANGLE;
      wiperDir   = -1;
    } else if (wiperAngle <= WIPER_MIN_ANGLE) {
      wiperAngle = WIPER_MIN_ANGLE;
      wiperDir   = 1;
    }

    wiperServo.write(wiperAngle); // servo mirrors the drawn angle
  } else {
    sunPhase = (sunPhase + 1) % 16;
  }
}

// -------------------- DRAW HELPERS --------------------
void drawWiper() {
  int pivotX = SCREEN_WIDTH / 2;
  int pivotY = SCREEN_HEIGHT - 4;
  int length = 40;

  float rad = wiperAngle * PI / 180.0;
  int endX = pivotX + (int)(length * cos(rad));
  int endY = pivotY - (int)(length * sin(rad));

  display.drawLine(pivotX, pivotY, endX, endY, WHITE);
  display.drawLine(pivotX - 1, pivotY, endX - 1, endY, WHITE);
}

void drawSun() {
  int cx = SCREEN_WIDTH - 26;
  int cy = 22;
  int radius = 9;

  display.fillCircle(cx, cy, radius, WHITE);

  for (int i = 0; i < 8; i++) {
    float baseAngleDeg = i * 45;
    float angleDeg = baseAngleDeg + sunPhase * 4;
    float rad = angleDeg * PI / 180.0;

    int innerR = radius + 2;
    int outerR = radius + 7;

    int x1 = cx + (int)(innerR * cos(rad));
    int y1 = cy + (int)(innerR * sin(rad));
    int x2 = cx + (int)(outerR * cos(rad));
    int y2 = cy + (int)(outerR * sin(rad));

    display.drawLine(x1, y1, x2, y2, WHITE);
  }
}

void drawScene() {
  display.clearDisplay();

  int wx = 4, wy = 18;
  int ww = SCREEN_WIDTH - 8;
  int wh = SCREEN_HEIGHT - 22;
  display.drawRoundRect(wx, wy, ww, wh, 4, WHITE);

  if (rainState == RAIN_WET) {
    for (int i = 0; i < MAX_DROPS; i++) {
      int x = drops[i].x;
      int y = drops[i].y;
      if (x >= wx + 2 && x <= wx + ww - 4 &&
          y >= wy + 2 && y <= wy + wh - 4) {
        display.drawLine(x, y, x, y + 3, WHITE);
      }
    }
    drawWiper();
  } else {
    drawSun();
  }

  display.display();
}

void setup() {
  Serial.begin(9600);
  pinMode(RAIN_PIN, INPUT);

  if (!display.begin(SSD1306_SWITCHCAPVCC, 0x3C)) {
    Serial.println(F("SSD1306 init failed!"));
    while (true) {}
  }

  wiperServo.attach(SERVO_PIN);
  wiperServo.write(WIPER_MIN_ANGLE);

  randomSeed(analogRead(A1));
  initDrops();
  drawScene();
}

void loop() {
  unsigned long now = millis();

  if (now - lastSensorReadMs >= SENSOR_INTERVAL_MS) {
    lastSensorReadMs = now;
    int level = digitalRead(RAIN_PIN);
    updateRainStateDigital(level);
  }

  if (now - lastAnimMs >= animIntervalMs) {
    lastAnimMs = now;
    stepAnimations();
    drawScene();
  }
}
Code Walkthrough
The sketch uses millis() instead of delay() so the rain sensor can
be polled every 200 ms while the OLED animation keeps redrawing every 60 ms, independently.
updateRainStateDigital() only acts when the rain state actually changes — going
from dry to wet or back — rather than running logic on every loop. When it’s wet, the wiper
angle drawn on screen is sent straight to the physical MG90 servo via
wiperServo.write(wiperAngle), so the OLED graphic and the real wiper arm always
move in sync. When it dries out, the wiper parks at WIPER_MIN_ANGLE and the screen
switches to the rotating sun animation.
Output / Results
In dry conditions, the OLED shows a “windshield” frame with a small animated sun in the
corner. As soon as water touches the rain sensor, raindrops start falling inside the frame and
the wiper line — along with the real servo arm — begins sweeping back and forth, just like a
car’s automatic wiper system.
Troubleshooting
- Wiper never starts even when wet: Your rain sensor board may be active HIGH instead of active LOW — change
RAIN_ACTIVE_LEVELtoHIGHand retest. - Wiper triggers randomly with no water: Adjust the sensitivity trimmer on the rain sensor module, or check for a loose ground connection causing noisy readings.
- OLED freezes during the wet animation: Make sure the servo isn’t starving the Nano of power — use a separate 5V source for the MG90.
- Servo doesn’t move at all: Confirm the signal wire is on D3 and that the Servo library was included before any other library that uses Timer1.
Extensions & Next Steps
Ready to go further? Try these extensions:
- Add a buzzer alert that beeps once when rain is first detected, useful for a smart window-closing system.
- Log rain events with timestamps to track rainfall patterns over a week.
- Combine this with a DHT22 sensor to also display humidity alongside the rain status.
